Meet with your Advisor
Meet with your Area of Study Advisor to make sure you are picking the right classes for your degree or certificate program. You can plan out your whole program, or register semester by semester.
Step-by-Step Registration Instructions
You’ve met with your advisor and you’ve made your plan. Now you’re ready to start the registration process.
Select Classes and Add to Your Program Plan
Once you’ve logged in follow the steps below:
- Click on Register for Classes (scroll down in mobile). This brings you to Self Service.
- In Self Service, use the directional arrows to select the upcoming semester.
- If you already know the courses you need to take, go straight to Plan and Schedule. On mobile, go to the menu in the top left, and choose the Academics dropdown. Use the search bar to find the course and section for your program. Use course name or course ID (e.g., COMM-1301). IMPORTANT: Make sure you have selected the correct semester you’re registering for.
- Filter by campus, availability, instructor, and schedule.
- Click on view available sections, and choose the class that meets your schedule. Note: Read section details carefully, including any required prerequisites or restrictions.
- When you’ve confirmed the class, Click Add Section to Schedule. You’ll see a message showing that your course has been added.
- To add additional classes, repeat this process.
- To check your progress, under the Student Planning dropdown, click on My Progress. On mobile, go to the menu in the upper left and select Academics. You can follow these same directions to add upcoming courses to your plan, so that next time you register, you’ll know exactly what classes you need to take.
- Go back to the Student Planning tab (Mobile users: On the upper left drop down menu, choose Academics, then Student Planning) and select Plan & Schedule. Now the planned courses will be listed in yellow.
Not sure which classes are right for you yet?
Explore class options offered online and across ACC’s 11 Central Texas campuses.
Click either:
Register for each course individually
or
Register Now to register for all courses at once.
NOTE: Courses you have successfully registered for are highlighted in green and will state “Registered, but not started.”
If you are unable to click Register:
- Check your registration date or review the Notifications at the top of your screen.
- Follow instructions to remove holds. Your selected courses will remain on your plan until you register or remove the courses from the plan.
If your desired class is full, you will be put on a waitlist.
- Check your ACC student email daily to ensure you don’t miss any openings.
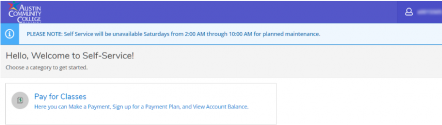
You can pay tuition with check, credit card, or debit card.
NOTE: Only students who are registered and have paid for courses may attend classes.
While you are in Self Service and Plan and Schedule, you can go directly to Pay for Classes. Follow the directions so you don’t lose your classes.
NEW STUDENTS: Complete the meningitis immunization requirement by the tuition deadline or you will be dropped from classes.
Avoid being dropped from classes
Tuition Deadlines
Follow Austin Community College’s tuition deadlines to avoid being dropped from classes. Learn more at Tuition Deadlines and Payment Information.
Payment Plans
You can also set up an interest-free payment plan to help manage the cost of tuition. Learn about payment plans.
Tips for Registering
Registration can be confusing; these tips will help make registering for classes go smoothly.
View the My Status and Holds page in the MyACC portal and follow the instructions to clear any holds.
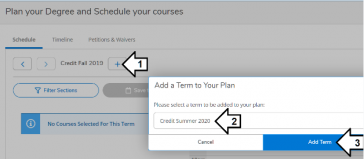
Make sure you’re working in the correct semester. Use the directional arrows to choose the correct semester to register for or to add to your plan. You can create a semester plan with three simple clicks on the Plan and Schedule page.
If you only see a “Pay for Classes” option:
If you only see a “Pay for Classes” option, it may be that your application is still being processed. Contact the Student Help Desk for assistance.
If you see a “spinning” or loading icon and cannot register:
Registration issues may be due to high traffic volume. This is common during the first few days of registration.
If you have created a plan, added sections to your plan and you still cannot register please try to:
- Sign out of Self Service and try again, or
- Sign in to Self Service using a different web browser, or without your current browser in “private” or “incognito” mode, or
- Try to sign in at a different time, as traffic may have subsided.
- Contact the Student Help Desk for assistance.